How to
We did our best and wrote brief manuals on almost each aspect of using (working with) Jambler.io platform. If you did not find a comprehensive answer to your ‘How to’ question, feel free to contact us in any convenient for you way.
How to register on Jambler.io using Telegram account
How to sign up for Jambler.io using Jabber
Partner Mixer Deployment on a VPS (Clearnet Website, TOR Mirror, Telegram Bot)
How to register on Jambler.io using telegram account
- Please open the registration page
- Make sure the radio button Telegram is selected in the yellow frame (it is usually selected by default)
- In the Username field please enter your Telegram username which starts with @
(make sure that you DO NOT ENTER e-mail address or telephone number, they won’t work)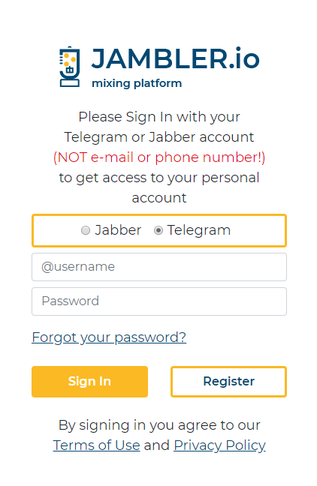
- Enter your password and then click Register
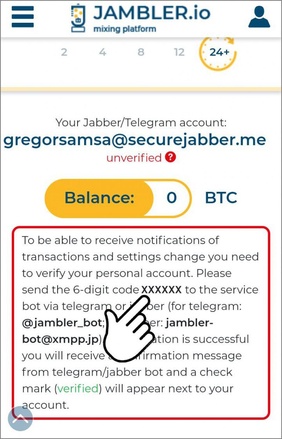
After registration you will be asked to verify your Jambler.io account (we recommend following this procedure in order to receive notifications of transactions and settings change).
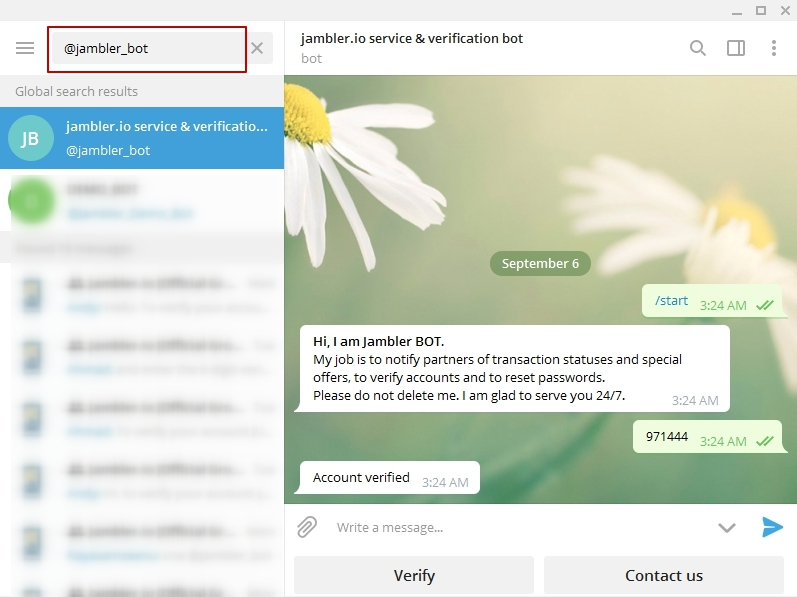
- Please find in your telegram app Jambler.io telegram service bot @jambler_bot (make sure that you do not send the code to the official Jambler.io telegram group)
- Start the conversation with @jambler_bot by clicking on the corresponding ‘start’ button. Send the 6-digit code from the message at the top of your Jambler.io personal account page to @jambler_bot

- Wait for the confirmation message from the bot and update your Jambler.io personal account page
Now you can proceed to build your own mixer.
In case of any issues, feel free to contact Jambler.io Tech Support team at [email protected]
How to sign up for Jambler.io using Jabber
Prerequisites:
To illustrate the process of registration we use jabber server - https://securejabber.me and Jabber client - Yaxim
We assume that you already have Jabber account and Jabber client. Otherwise, follow these two steps:
- To create Jabber account go to any Jabber server, for example, https://securejabber.me/en_account.html and create a new account, following the detailed instructions. Your JID (Jabber IDentifier) will be of the form: username@server
- Install jabber client on your device. We use Yaxim as an example. After installing set up client connection to the server
Step-By-Step Instructions
1. Sign up for Jambler.io using your jabber account
- Go to https://jambler.io/sign-in.php
- Select radio button Jabber
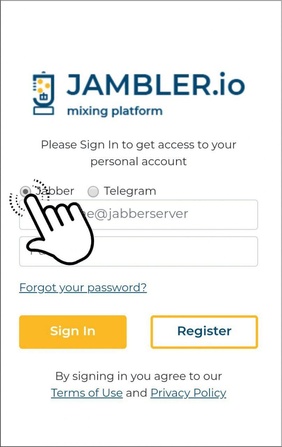
- Enter your Jabber ID (username@server) in the corresponding field and choose a password
- Click Register
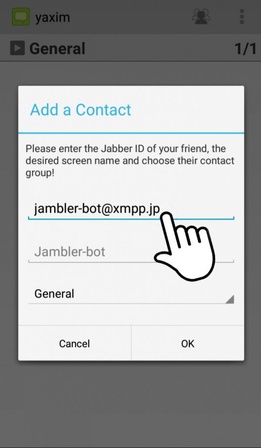
2. In your Jabber client find Jambler service bot [email protected]
- In the case of Yaxim, сlick settings at the right top corner => Add contact. Enter [email protected] and click Ok
3. Verify your Jambler personal account:
- Go to https://jambler.io/sign-in.php, open your personal account page and copy/remember the 6-digit verification code
- Open your jabber client. Click Jambler service bot you added
- Paste/enter the 6-digit code and click Ok
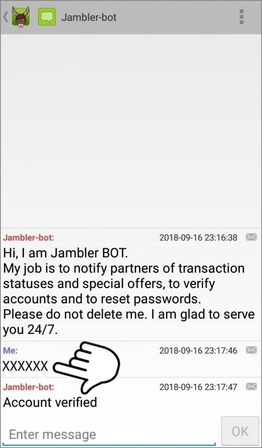
4. If verification is successful,
- you will receive a confirmation message from bot,
- and a checkmark “verified” will appear next to your username on your Jambler account page

Partner Mixer Deployment on a VPS (Clearnet Website, TOR Mirror, Telegram Bot)
Prerequisites
- Before starting we expect you to do some preparatory work. Please make sure that you have a domain name, a VPS (Virtual Private Server), set-up DNS rules for the domain & SSL certificates (it is optional; however we recommend to install them)
- Register on Jambler.io website, execute verification of your account
Important
- The instructions below assume that the installation of your mixer website is done on clean Debian 9 Operational System with the help of the script provided by Jambler.io
- The installation on other operational systems or installation of all components apart are not described in the following instructions
- These instructions describe the installation of your mixer website on a VPS, not on a shared hosting
Once you have registered on Jambler.io website and have verified your account, you need to follow the steps below:
- Define Mixer Attributes in your personal account on Jambler.io
- Execute an installation script for a clearnet website, TOR mirror and a Telegram bot on a VPS
- Configure a clearnet website and TOR mirror
- Set-up a Telegram bot
Step 1: Define Mixer Attributes
Go to https://jambler.io/account-partner.php and fill in the corresponding attributes
Bitcoin Mixer Name (mandatory) - this name will be displayed on your mixer website, Telegram bot and in letters of guarantee
BTC Address for Profit Withdrawal (mandatory) – a bitcoin address to which you would like to receive commission (money)
Language of letter of guarantee (optional) - a language in which letters of guarantee on behalf of your mixer will be generated by the platform
Partner Mixer Commission (optional) - a commission that will be paid to a partner for every transaction. A partner can specify any commission ranging from 1% to 10%. We recommend a commission of 2%
Automated Withdrawal Sum (optional) - when a specified value is reached, your profit will be automatically sent to a recently indicated address
Partner’s API Keys (optional) - API key (an application programming interface key) is a unique code that is passed in to an application programming interface (API) to identify the calling application or user. API keys are used to track and control how the API is being used, for example to prevent malicious use or abuse of the API.
You need an API key for your mixer website and a telegram bot in order Jambler.io could identify you as a partner. You can protect an API key by entering an IP address of your server where the mixer/Telegram bot is deployed. Several keys with various security settings can be created.
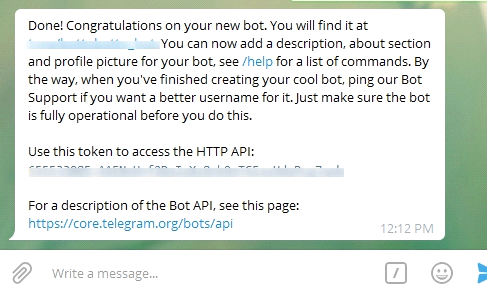
Step 2: Create your Telegram bot
At this stage you need a Telegram token for a bot and a bot name. You can get them via @BotFather. Just open your Telegram app, search for @BotFather and start the chat. Use the /newbot command and follow the instructions to create a new bot.
Step 3: Execute a script for a clearnet website, TOR mirror and a Telegram bot
You will need an SSH client to access your hosting server. In this manual we use PuTTY for this purpose.
For setting up you need a VPS (Virtual Private Server – your hosting server) with clean Debian 9 OS with a root account.
Open your terminal client (e.g. PuTTY). Connect to your VPS (your hosting server). Log in as root and enter your password.
To download the script, run the command:wget https://jambler.io/src/mixer-install.sh
To set up required permissions run the command:chmod 755 mixer-install.sh
Now launch the script using the command:./mixer-install.sh
The script will ask for your domain name, the Jambler API key and the Telegram token. Enter them and proceed.
All necessary components including Nginx, Tor, Node.JS, PHP will be uploaded and installed with the script.
Besides all necessary services, this script will download and install the package https://github.com/jambler-io/bitcoin-mixer.git.
Wait until all commands are executed, it can take some time.
Step 4: Additional procedures
Note: To configure the hosting server you will need a terminal client, an SFTP client and a text editor. As an example we use PuTTY – SSH client to access a VPS , FileZilla – an SFTP client and JetBrains PhpStorm to edit configuration files.
At some point after the script installation you may need to change your the API key or the Telegram token. Here is how you can do it.
Changing the API key in the website
Open your SFTP client. Download the file index.php from the directory /var/www/html from VPS server on your local computer.
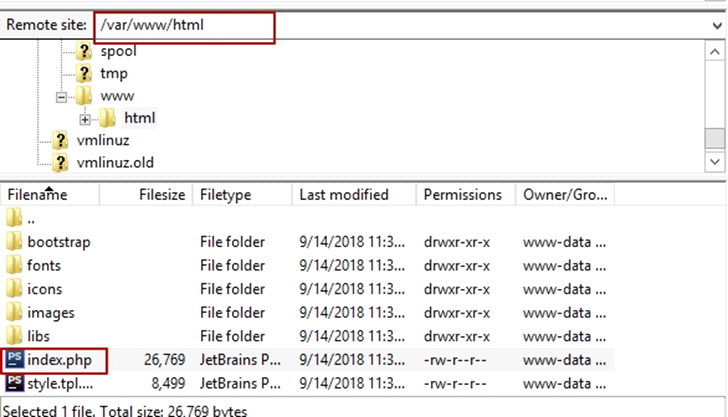
Open the file in the text editor software. Insert a new API key in quotes after the eponymous variable in the beginning of the document:
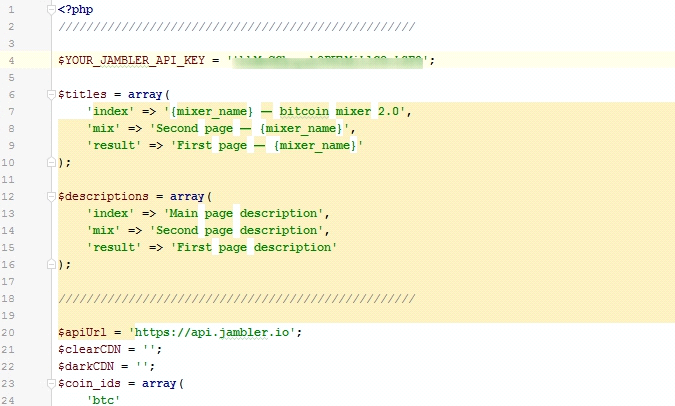
Save changes and upload the updated file on remote VPS server using your SFTP client.
Changing the API key and token used by the bot
Open your SFTP client. Download the file config.js from the directory /var/mixer-bot/ from VPS server on your local computer.
Open the file in the text editor software. Enter your Telegram token you got via @BotFather and API Key you can find in your personal account on Jambler.io in the corresponding fields.
- YOUR_TELEGRAM_TOKEN – Telegram token
- YOUR_JAMBLER_API_KEY – Jambler Partner API Key
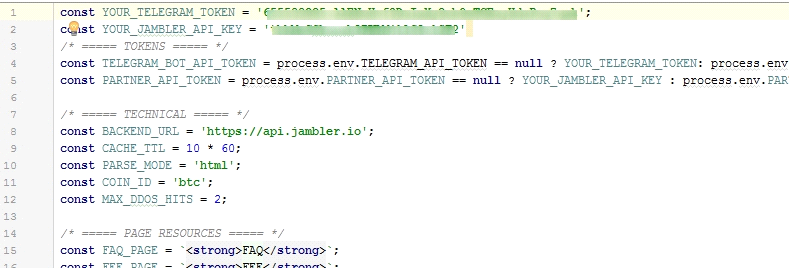
Save changes and upload the updated file on remote VPS server using your SFTP client.
Open your terminal client. To apply changes run the command:cd /var/mixer-bot; npm install; service supervisor start
Now your mixer bot is ready to work. To check it, enter /start and after that follow the instructions of the bot.

Now your mixer website, TOR mirror and telegram bot are configured and you can start working.
Website verification
To test your website performance, please open your mixer website in browser http://your_mixer_domain_name. Your mixer name will be displayed at the top of the page.
Click Start Bitcoin Anonymization, enter your Bitcoin address(es) and click Mix My Coins button. If the mixer website is successfully installed, you will get:
- On the website:
- a letter of guarantee
- a forward address for sending money
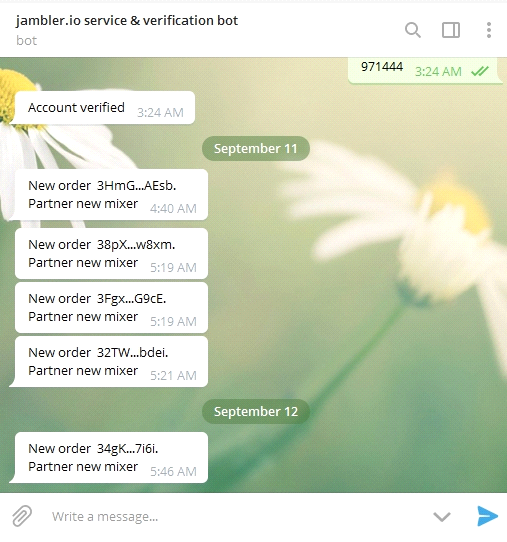
- In your Telegram account:
- a message from our service bot with a new request
SSL certificates configuration
The installation of the SSL certificates is optional; however we recommend doing it.
By default the SSL certificate is not installed. It is up to you to include it on your website or not.
Upload the SSL certificates site.pem and site.key in the following folder /etc/nginx/ssl
Once the SSL certificates are uploaded, please uncomment the nine lines in SSL block and comment out the line:listen 80
to prevent access to your website without SSL. You can do it in the following file: /etc/nginx/conf.d/www_site.conf
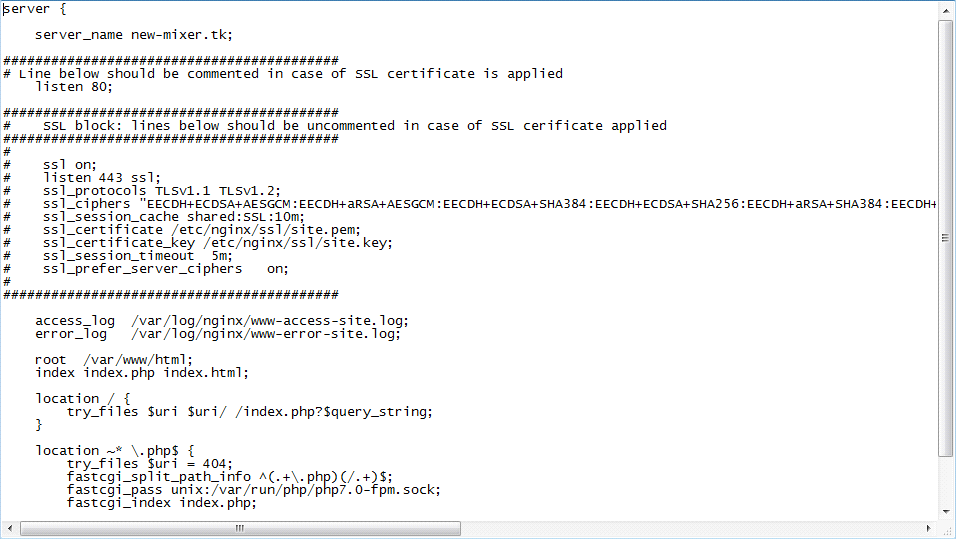
Restart nginx with the following command:service nginx reload
After that the SSL certificates will be integrated.
TOR mirror
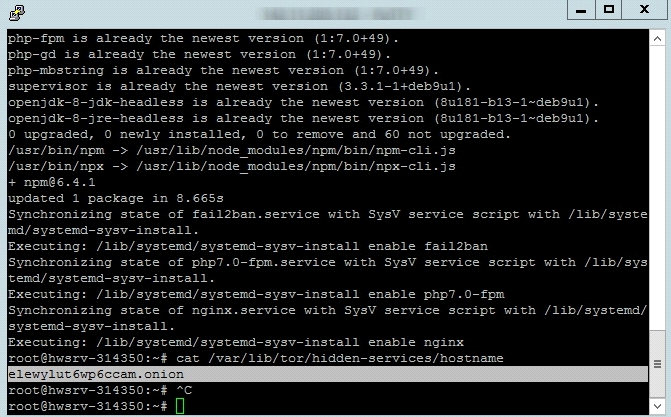
TOR name of your website will be generated automatically by the installation script. To get it, please, run the command:cat /var/lib/tor/hidden-services/hostname
using your terminal client.
We recommend following the same steps as in clearnet to check the functioning of TOR mirror.
Verifying a PGP-signed message using Gpg4win
Whether you mix coins using our platform or invest your coins into it, upon every operation we provide you with a letter that serves to assure our obligations towards you. We call it the Letter of Guarantee. Every such letter is accompanied by a digital PGP signature which constitutes infallible cryptographic proof of authenticity and integrity of the message.
You can store our letters of guarantee and verify their signatures at any time, confirming that they were indeed issued by our platform and contain true information about operations conducted with us.
So, how do you verify our letters? You will need special software for this, but not to worry: we have prepared very detailed directions on what we think is the easiest way to verify PGP signatures.
1. Installing Gpg4win.
- Go to https://www.gpg4win.org/ and click the Download link.
- Choose “$0” and click the Download button.
- Download the setup file and run it.
- Click Next to proceed to component selection.
- For simple verification of our guarantee letters you only need GnuPG and the Kleopatra front-end, but feel free to mark other components that you think you could use for something else.
- Click Next, then Install.
- When the installer is done, click Finish.
2. Importing Jambler's public key.
- Download our key file to your computer: https://jambler.io/pgp-key.txt
- Start Kleopatra, if it is not already running.
- Click Import.
- Click the drop-down on the bottom-right of the file selection dialog and choose “Any files” instead of “Certificates”.
- Navigate to the key file you have saved, select it and click Open.
- Click No to the dialog box. For simplicity's sake, we will skip this step for now.
- If everything is done correctly, our key is now showing on the list and you are ready to start verifying messages signed with it.
3. Verifying signed messages.
- In Kleopatra, click Decrypt/Verify.
- Browse to our letter of guarantee that you want to verify and click Open.
- If the signature is valid, the result will contain our information and look like this:
This result means the signature on the message is valid, but the software does not know how trustworthy the issuer is. Another variant of a successful result looks like this:
If you are not getting this result yet, you will after step 4.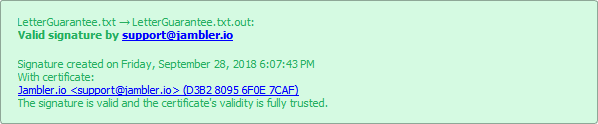
- If the signature is invalid, the result will look like this:

- Unless the result says “Invalid signature” in red, the verification is passed. You have just confirmed that the letter has been issued by Jambler and contains true information about our obligations to you. Any given signature is valid only for the exact text used to generate it, so it proves that the letter has not been tampered with and says exactly what we wanted it to say.
4. (Optional) Certifying Jambler's key with your own private key.
- To tell the software that this key is trustworthy, you can certify it yourself (after making sure it comes from us, of course).
- Assuming you have no personal certificates yet, you will need to create one. In Kleopatra, go to File → New Key Pair, then click “Create a personal OpenPGP key pair”.
- Enter your name and/or email (at least one of the two is required). This information will be seen by the recipients of messages you sign with this certificate. Click Next.
- Enter a passphrase. It will be required to sign and certify things later. Click OK.
- Click Finish.
- Highlight our key on the list and click Certify.
- Mark the Jambler.io certificate on the list.
- Go to our website (jambler.io on the clearnet, or jamblery7zgxknhjtmj3mhfdajmyddqxbufrf6voa32h5w4otux3crqd.onion on Tor). Compare the fingerprints shown in Kleopatra and at the bottom of our web page.
- If the fingerprints match, check “I have verified the fingerprint” and click Next.
- Click Certify and enter your passphrase.
- Click Finish.
- Now our certificate will show as trusted during verification.